Hanging chair instructions
 WHAT YOU REQUIRE:
- Drill
- Eye Screw
- Snap Hook or Similar
- Stud finder
We recommend you use a builder to hang your chair in a suitable location to ensure it can support the weight of the chair and person sitting in it.
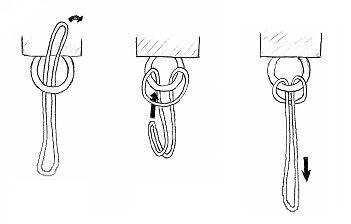
Your builder will locate a ceiling joist/structural beam. There are various methods to hang your chair however the easiest is to use an eye screw that is pre drilled and placed into the centre of your structural beam. Once your eye screw is secured into your beam, secure your rope to a snap hook or similar and attach the snap hook to the eye screw that is already attached to the ceiling. You can secure the rope directly to the eye screw if this is preferred
HOW TO TIE UP YOUR HANGING CHAIR:
These gorgeous rattan hanging chairs will instantly elevate the appearance of your living spaces with their effortless and timeless allure. Setting them up couldn’t be any easier either, and in this simple step-by-step guide we’ve outlined some of the easiest and fastest knotting techniques around. Knowing that your hanging chair is secured will assure you that it won’t fall the moment you or anyone else tries to mount it – and you can experience blissful relaxation with complete peace of mind.
It’ll only takes a few moments and perhaps a couple of practises before you’ll be securing and typing up hanging chairs as if you’ve been doing it your whole life, and knowing how to tie impenetrable knots is a worthwhile skill to have anyway.
Bowline Knots
This is perhaps one of the simplest and most versatile knots around, and it is so much easier to do that it may initially look!
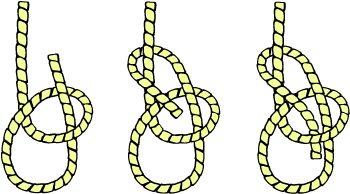
- Ensuring there is enough length on either side, create a loop in the centre of the rope.
- As depicted in the first illustration, pass one end of the rope through the loop.
- As shown in the second illustration, pass this end down through the loop once again.
- Continue to pull the end through until it has tightened into a secure knot.

Clove Hitch Knot
This is another incredibly reliable and safe way to attach your hanging chair, and it can be used quite easily with hoops or rods for additional security.
- First and foremost, pass the rope over itself to create a loop.
- Pass the end of the rope over itself again in order to create another loop.
- Pull the second loop through the first loop as demonstrated below.
- Pull in order to tighten the knot.

Half-Hitch Knots
A half-hitch knot is a variation of the clove hitch knot describes above. Depending on the length of the rope you have on hand, you can create as few or as many hitches as you look. With a longer rope, it’s always a good idea to create two or three hitches for some more peace of mind.
- Insert this end through the eye of the loop you created before.
- These are two half-hitch knots. You can always create another one for some extra security.

SOME FINAL THOUGHTS
Hanging chairs and hammocks are an amazing addition to your living spaces and, now that you’re equipped with these versatile knot-tying techniques, you can truly enjoy your hanging furniture.
With their gentle swaying motions, hanging chairs are such an exquisitely wonderful treat, and you can enjoy this coveted luxury in your everyday life, and bring some of the wonders and magic of an outdoor adventure into the warmth of your home.
However, please remember to take care and remind young children that they are not a swing or a toy. Be cautious when sitting and standing from the chair and check your rope and fittings regularly for wear and tear.
FURNITURE CARE INSTRUCTIONS